Developer Guide
Introduction

Introduction to Zoomaster
Zoomaster is a Java application for the Command Line. It provides a simple and intuitive way to store Zoom links for
online classes and other useful links for the lesson at hand.
Zoomaster can also intelligently determine the current lesson users are having, allowing them to launch the correct links quickly and elegantly from the command line.
Target audience
This developer guide is for experienced programmers with knowledge of object oriented programming.
Purpose
This guide seeks to introduce to you the design and implementation of Zoomaster features. It will share our reasoning behind the way we implemented different features and its logic flow. With this, you would be able to tweak and further develop Zoomaster without confusion or introduce unwanted bugs to the App.
Scope
First, the guide will help you set up Zoomaster in its current iteration so that you can familiarise yourself with it.
Secondly, the guide will explain the design of Zoomaster and its various components.
Next, the guide will showcase how we implement various features into Zoomaster with
step by step explanations and diagram.
Finally, the guide has several appendixes explaining the scope of the product, user stories, non-function requirements,
glossary and instructions for manual testing.
Navigation
You can navigate the guide via the table of contents below.
Otherwise, each major section is distinguished by a bold header and underline. Sub-sections are of a smaller font than
major sections but still larger than normal paragraphs to distinguish them.
Table of contents
- Getting Started
- Design
- Implementation
- Appendix A: Product Scope
- Appendix B: User Stories
- Appendix C: Non-Functional Requirements
- Appendix D: Glossary
- Appendix E: Instructions for manual testing
Getting Started
First, download the source code and jar file of Zoomaster here.
Next, follow the startup procedures as stated in the User Guide and familiarize yourself with Zoomaster's features.
Now, you can dive into the source code and explore the inner workings of Zoomaster with this guide.
Design
This section explains the design behind Zoomaster by first sharing the grand architecture of the code then its various components.
Architecture
The figure below shows a high-level design for the architecture of Zoomaster.

Our Program can be split up into 7 components
- Initialization
- User Interface
- Parser
- Commands
- Lists
- Storage
- Local Files
These components interact with each other as shown in Figure 1.1 to execute the functionalities of Zoomaster.
Initialization
The diagram below shows a class-level diagram for Zoomaster.
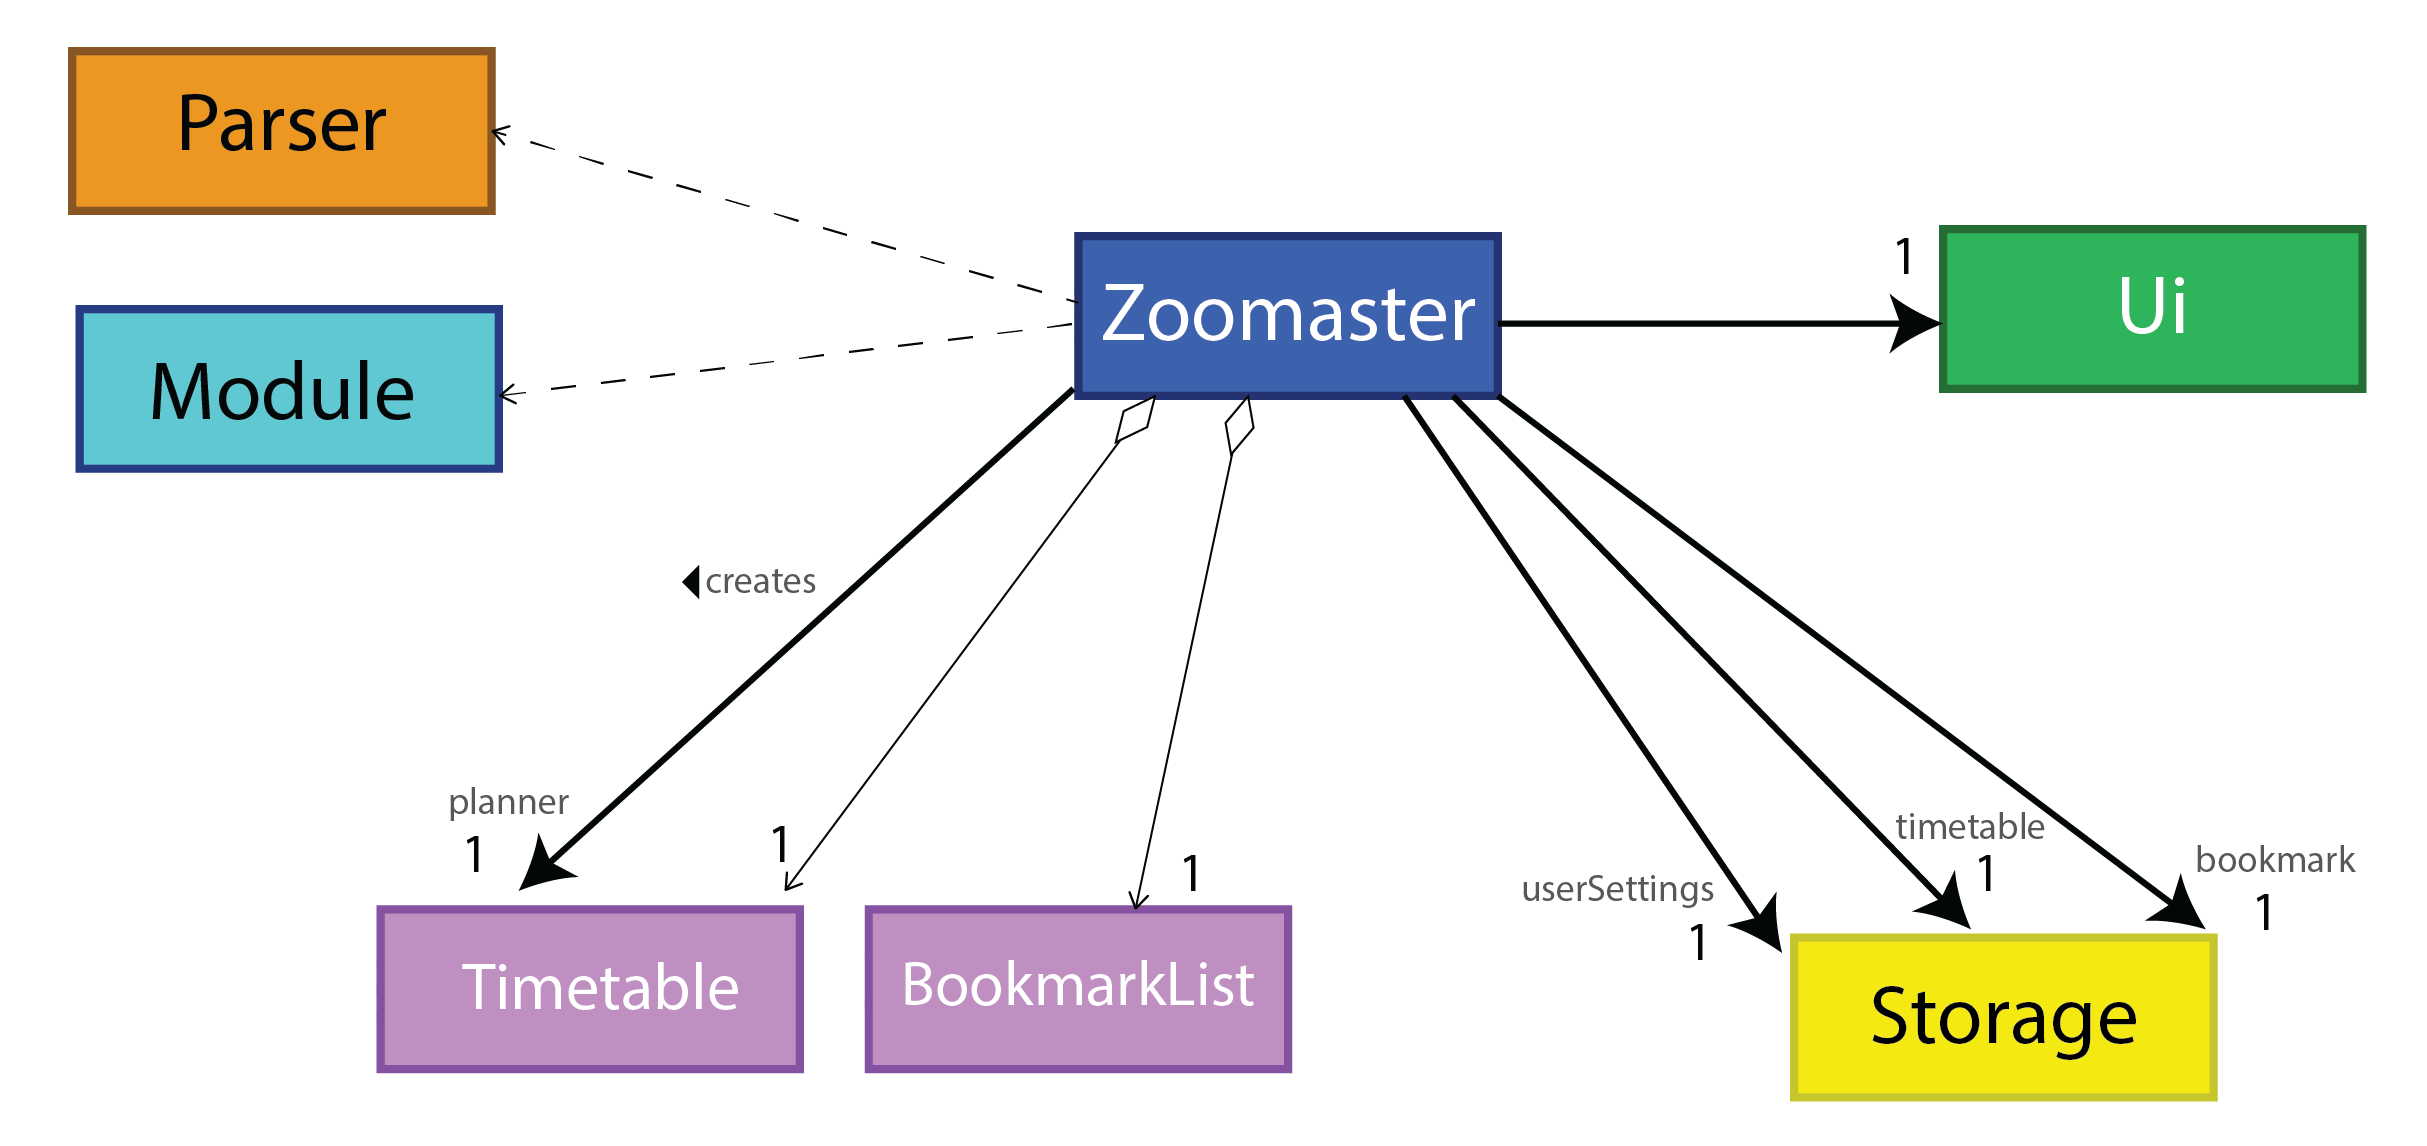
API:Zoomaster.java
The Initialization component is responsible for setting up Zoomaster for it to be used by users.
It consists of Zoomaster, Ui, Storage, BookmarkList, Timetable and Module classes.
Its main roles are:
- Retrieving bookmark, timetable and planner lists from storage if it exists.
- Set the list of Modules for Zoomaster
- Initializes the User Interface object, as well as the 3 Storage objects for
BookmarkList,TimetableandPlanner.
User Interface component
API:Ui.java
The UI component is responsible for all visual output to the User from the app.
The only class carrying out the component's function is the Ui class.
It utilises the Jansi library to enable the usage of ANSI escape codes to format the console,
allowing the app to output in colour.
The UI also receives input from the User using a Scanner object. It returns the input as a String
to the main function.
In addition, the UI contains the different exceptions and error messages which can be displayed. When a particular exception is thrown (eg. UNKNOWN_INPUT), the corresponding method is called in UI to print out the error message (printUnknownInputMessage()).
Its main roles are:
- Receiving user commands and returning it to the Main function.
- Prints visual output in the console for the User
Parser component

The Parser component is responsible for decoding the user's input and telling the Main function which command to execute.
It also contains the programMode which indicates which mode the program currently is in.
It initializes the different commands according to which mode the program currently is in.
It consists of Parser and the Command interface classes.
Its main roles are:
- Decoding users commands and returning the correct command to the Main function to be executed
- Catch errors in users commands and return the appropriate exception to the Main function
- Storing the mode Zoomaster is in (Bookmark/Timetable/Planner)
The interaction of the Parser component with the Command component is covered in greater detail below.
Commands component
Figures 1.4 to 1.7 below show the class-level diagrams for Parser and Command for each different mode.
The diagrams are colour coded as such:
- Orange -> Global
- Green -> Bookmark Mode
- Blue -> Timetable Mode
- Red -> Planner Mode
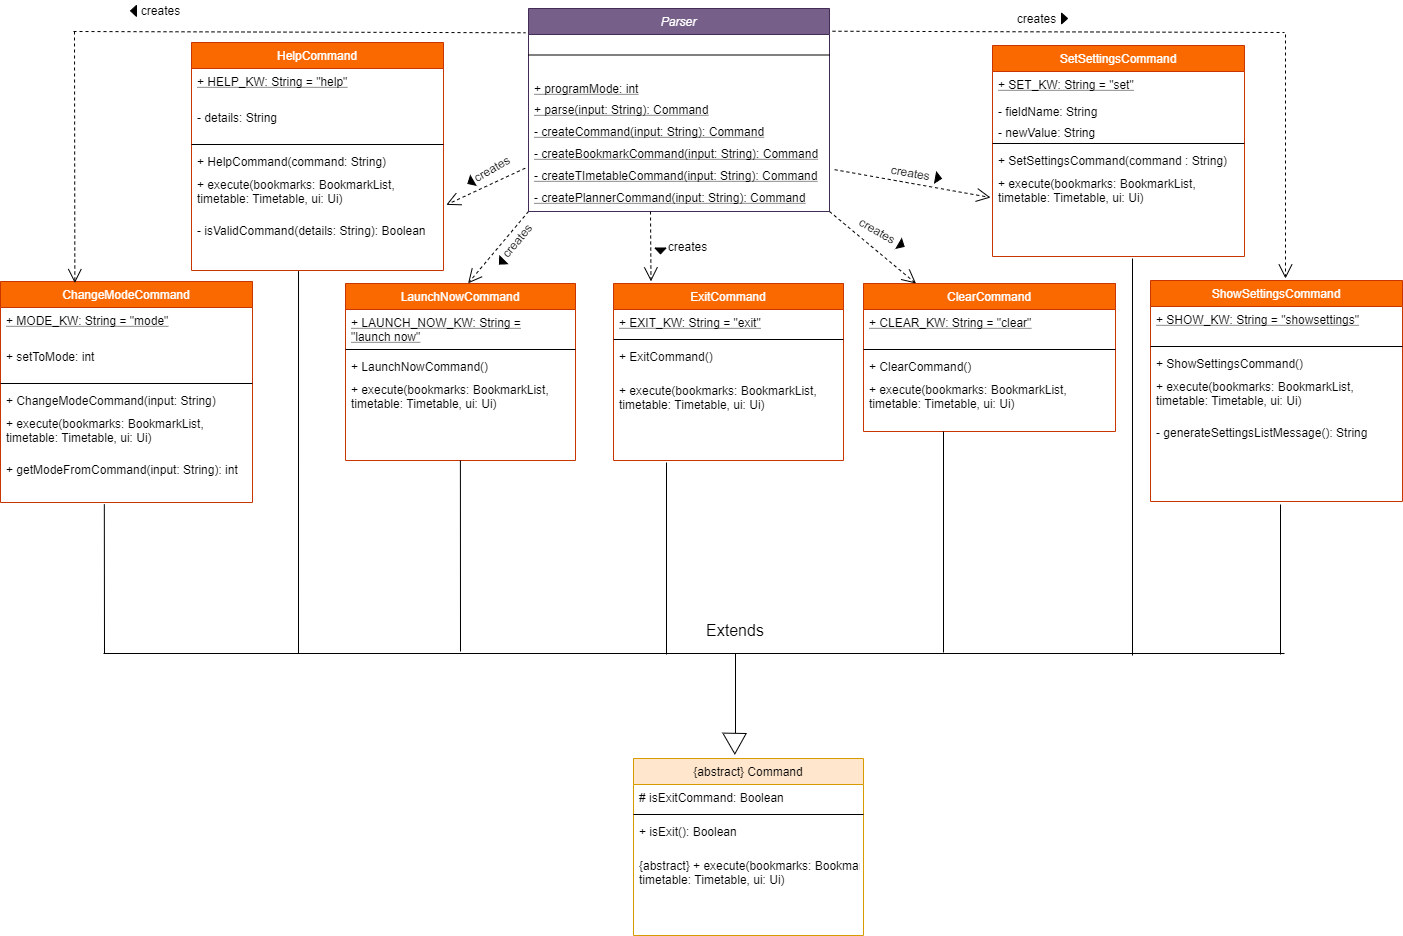
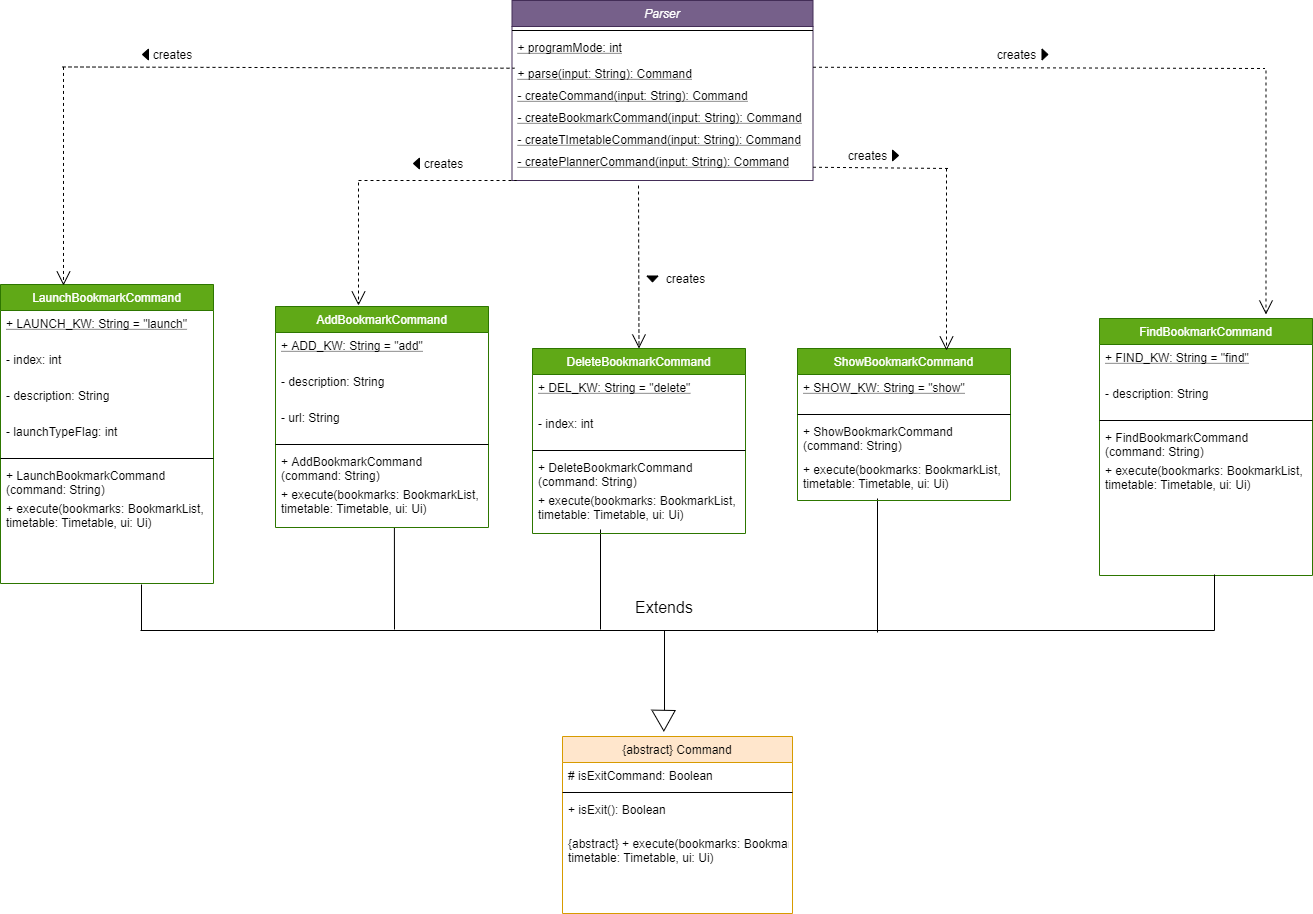
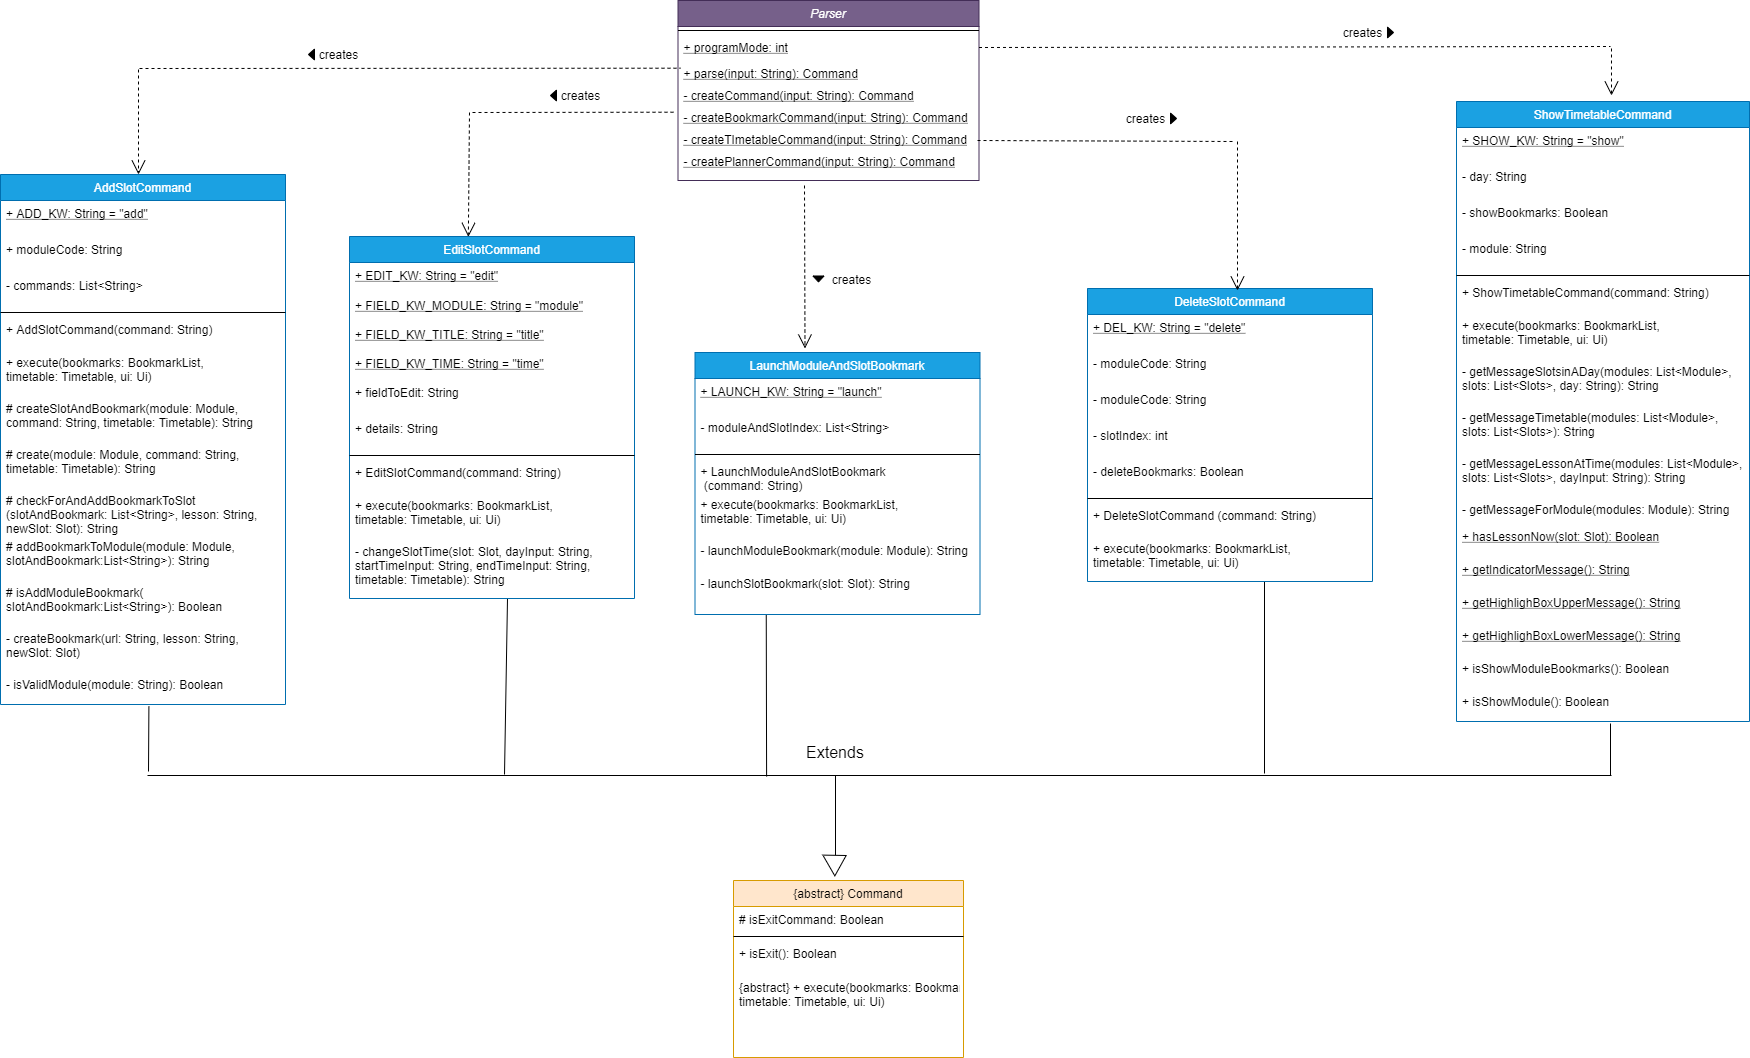
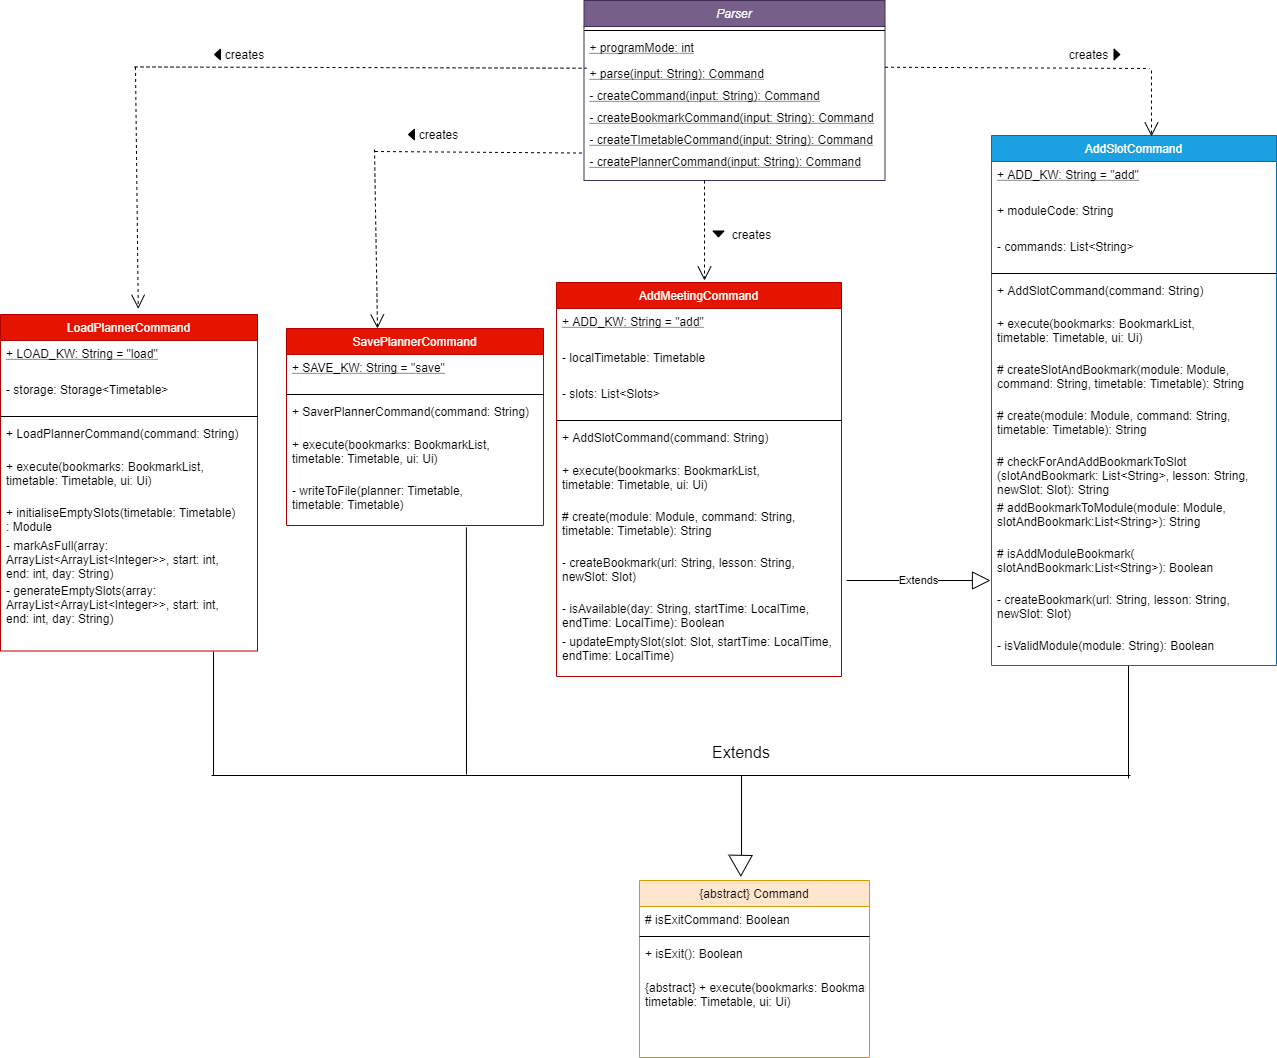
The Command component is responsible for carrying out the functions of Zoomaster.
Usually, a successful command will return a message to indicate a successful execution or updates to Zoomaster. Otherwise, it will create error messages for the Ui to display to the users.
It consists of ChangeModeCommand, ClearCommand, ExitCommand, HelpCommand, LaunchNowCommand,
ShowSettingsCommand, SetSettingsCommand, AddBookmarkCommand, DeleteBookmarkCommand, FindBookmarkCommand,
LaunchBookmarkCommand, ShowBookmarkCommand, AddTimetableCommand, DeleteTimetableCommand, ShowTimetableCommand,
EditTimetableCommand, LaunchTimetableCommand, AddMeetingCommand, LoadPlannerCommand and
SavePlannerCommand classes.
Its main roles are:
- Execute commands to carry out functionalities of Zoomaster
- Signal to Ui successful execution of commands
- Create messages for Ui on updates to Zoomaster
- Catch errors or conflicts in users commands and throw the appropriate exception to the Main function
Lists component
The Temp List component is responsible for holding on to temporary data of Zoomaster to be used by Commands.
It consists of BookmarkList, SlotList, Module and Timetable
Its main role is:
- Hold on to temporary data about Zoomaster
Storage component
The Storage component is responsible for saving and retrieving Zoomaster data to and from an external text file.
It uses Gson library to encode temporary data from Temp List into an HTML format. Then it writes the encoded data to
an external text file. On the other hand, it decodes the HTML format from the external text file and updates the
Temp List of Zoomaster.
The only class carrying out the component's function is the Storage class.
Its main roles are:
- Store Zoomaster data to an external text file for long term storage
- Retrieve Zoomaster data on Initialization
- Return error messages to the users during extraction or writing
Local Files component
The Local Files component is where Zoomaster's long term storage of data is kept
Its main role is:
- Store Zoomaster data
In addition, the file path to the directory containing the jar file is obtained by the getJarFilePath() method in Zoomaster.
The files are saved using this file path, allowing them to be saved in the same directory as the jar file. This allows for more convenient running of Zoomaster, as the user does not have to switch to the same directory of the jar file when running the application.
Implementation
This section explains the implementations of Zoomaster's features. It goes through the step-by-step process, expected outcomes of each feature and the design considerations.
Bookmark, Timetable and Planner modes feature (Tan Yu Shing)
Zoomaster has three modes for users to interact in. First, bookmark mode has the list of bookmarks with links to online resources. Secondly, timetable mode has a list of timetable slots. Lastly, planner mode which helps users plan their timetable. To simplify input commands for users, all lists have the same keywords for adding, deleting, and showing items in the lists. Hence, separating both lists into different modes allows both lists to access the same keywords without causing conflicts when parsing commands.
In this section, I will refer to input command and input parameter.
- input command refers to the string of characters the user has typed into the command line and entered into the program. Eg. "mode bookmark" is an input command
- input parameter refers to the string of characters the proceeds after the identifier string of the input command. Eg. "mode bookmark", "mode" is the identifier string of the command and "bookmark" is the input parameter.
Implementation
This feature extends Command class with a way to toggle between different modes of Zoomaster. The integer variable used to control the modes is stored in the Parser class called "programMode". Additionally, it implements the following operation:
- getModeFromCommand() - Decodes the command sent by the users to figure out which mode the user wants to move to.
Given below is a sequence diagram of how changing between modes occur.

-
When Zoomaster gets an input command from the user to change modes, a new ChangeModeCommand object is created.
-
The ChangeModeCommand passes the input command through getModeFromCommand() function to decode the mode the user wishes to change to.
-
Zoomaster now executes the command and changes to the respective mode.
-
If an invalid mode was given by the user or if the input field was empty, the execute function throws an exception and tells the user valid modes for Zoomaster.
The following activity diagram summarizes what happens when a user executes a new command:
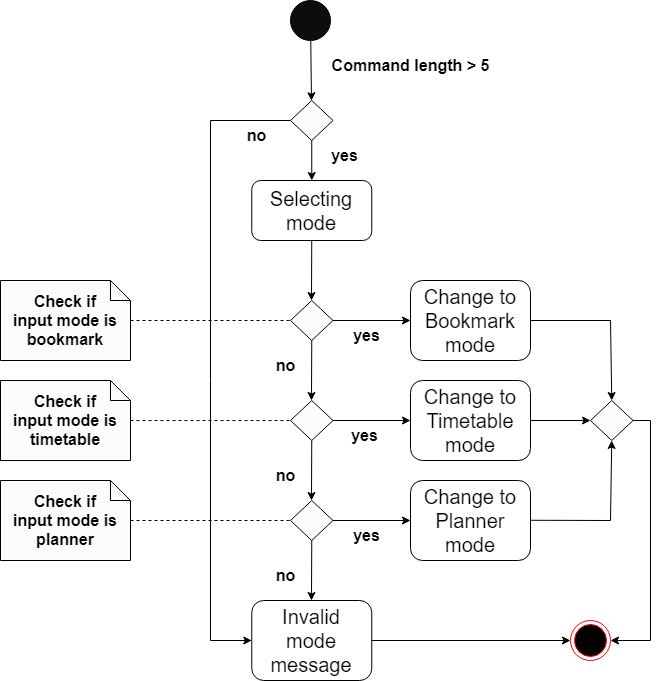
-
First, the program checks if the length of the input command is more than 5. Any input command of length less than 5 is an invalid mode command. This is because mode command requires an input parameter separated by a space hence "mode " or "mode1" are examples of invalid mode commands with a length of less than 5. If this is so, it throws an invalid mode message to tell the user the valid modes of Zoomaster. Else, it continues to the next step.
-
Secondly, the program checks if the input parameter corresponds to a valid mode of Zoomaster.
-
If the input parameter corresponds to "bookmark", the program changes the mode of Zoomaster to the bookmark mode.
-
If the input parameter corresponds to "timetable", the program changes the mode of Zoomaster to the timetable mode.
-
If the input parameter corresponds to "planner", the program changes the mode of Zoomaster to the planner mode.
-
If the input parameter does not correspond to any of the valid modes of Zoomaster, it throws an invalid mode message to tell the user the valid modes of Zoomaster.
Design consideration:
Aspect: How to store programMode variable for security
- Alternative 1 (Current choice): No security
- Pros: Easy to implement
- Cons: May introduce errors to the App if the variable is changed outside of ChangeModeCommand class objects.
- Alternative 2: Private variable and implement mode changing inside Parser class
- Pros: Ensure the App does not change modes outside commands to change modes.
- Cons: Reduces OOP standard of code by decoupling ChangeModeCommand from Command class and increases code complexity.
Show timetable feature (Tan Yu Shing)
Users can see the timetable they have created in the App using the show command.
They can see the complete timetable from monday to sunday, the timetable of a specified day of the week or the timetable today.
The commands for these are show, show {DAY} eg. show mon, show tue and show today.
In this section, I will refer to input command and input parameter.
- input command refers to the string of characters the user has typed into the command line and entered into the program.
Eg. "show today" is an input command
- input parameter refers to the string of characters the proceeds after the identifier string of the input command. Eg. "show sun", "show" is the identifier string of the command and "sun" is the input parameter.
Implementation
This feature extends the command class. It is a simple retrieval algorithm which firstly gets data from the Timetable class. Then sorts it by timing and add additional indicators for the users. And finally, prints it out using the User Interface. It uses SlotContainer class sortSlotsByTime method to help sort the list of lessons and it's module code by timing. Additionally, it implements the following operations:
- getMessageSlotsInADay(List
modules, List slots, String day) - Retrieves all the lesson slots and it's respective module code on the day specified. It then sorts the lessons by timing and returns it as a message string. If valid, additional formatting such as current lesson indicator or current time indicator is added to the message string. - getMessageTimetable(List
modules, List slots) - Retrieves all the lesson slots and it's respective module code for the whole week. It then sorts the lessons by timing and returns it as a message string. If valid, additional formatting such as current lesson indicator or current time indicator is added to the message string. - getMessageLessonAtTime(List
modules, List slots, String dayInput) - Decodes the mode the user wants the timetable to be printed out in using dayInput. Then calls the appropriate methods such as getMessageSlotsInADay and getMessageTimetable to get the message string which is then returned to the execute function to be printed out by the User Interface. If the timetable is empty or an invalid dayInput is given, an exception is thrown to tell users their mistake. - hasLessonNow(Slot slot) - Checks if a slot timing is overlapping with the current system time. Returns a boolean true or false based on the check.
- getIndicatorMessage() - Returns a String containing an indicator with the current system time.
- getHighlighBoxUpperMessage() - Returns a String containing an indicator with a message "lesson now".
- getHighlighBoxLowerMessage() - Returns a String containing a indicator.
Given below is a sequence diagram of how printing the timetable occurs.

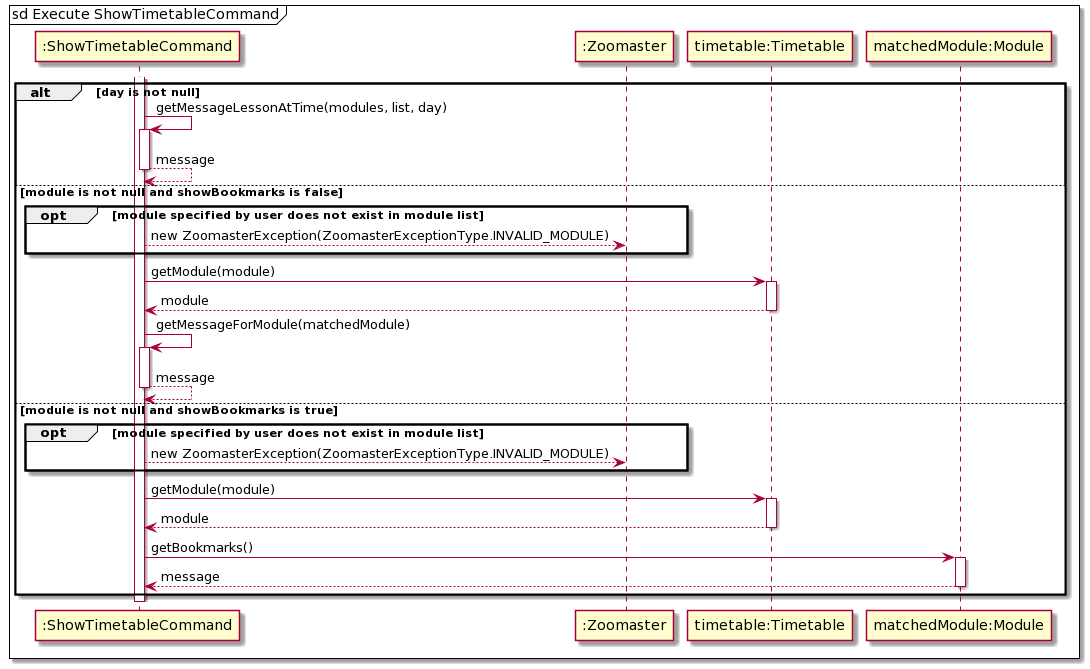
-
When Zoomaster gets a command from the user to show the timetable, a new ShowTimetableCommand object is created.
-
The ShowTimetableCommand decodes the input command to retrieve the way the user wishes to view the timetable.
-
If an invalid input day is entered by the user, the input day will be set as null.
-
Zoomaster now executes the command and displays the timetable in the requested mode.
-
If the input day is null, no timetable will be printed out. Instead, the program checks for does checks for Show Lesson Bookmarks feature.
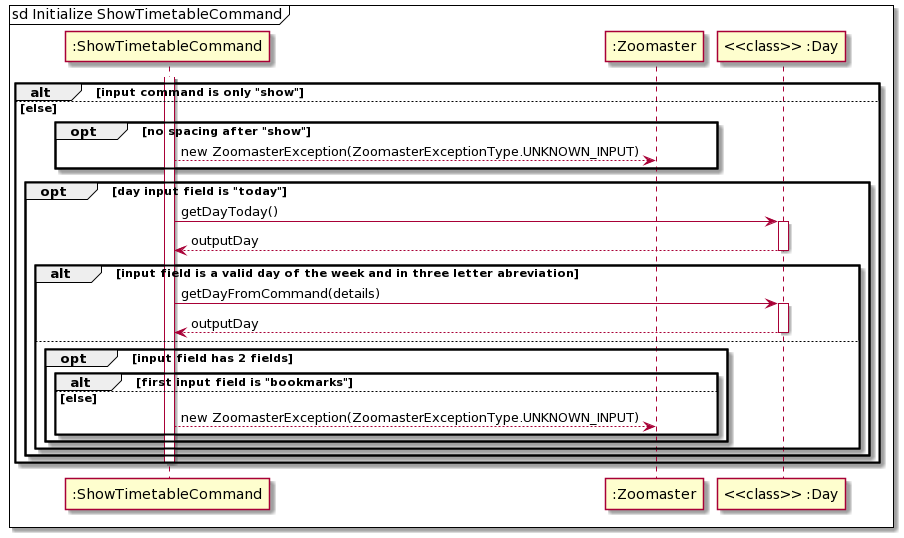
The following activity diagram summarizes what happens when a user executes a new command:

-
First, the program checks if the input command is just "show". This corresponds to the user requesting the full timetable. Hence, it sets day variable as "ALL" and moves on to the Execute step, step 6. Else it continues to decode the input command.
-
Secondly, the program checks for spacing error in the command. Show command requires a space after "show" help decode the input command. Hence, if there is no space after "show", the program throws an Unknown Input ZoomasterException and shows the list of valid commands.
-
Next, the program checks if the input parameter is "today". This corresponds to the user requesting the timetable on the day of the current system time. Hence, it sets day variable as the day of the current system time and moves on to the Execute step, step 6. Else it continues to further check the input command.
-
Afterwards, the program checks if the input parameter corresponds to a valid day of the week in its three-letter abbreviation. If so, it sets day variable as that of input parameter and moves on to the Execute step, step 6.
-
Else, if the input parameter does not correspond to any of the valid inputs. The program sets day variable as "NULL".
-
Now, the program executes. If the day variable is not "NULL", it prints the corresponding timetable the user wants.
-
If the day variable is "NULL", the program moves on to the Show Lesson Bookmarks feature.
Design consideration:
Aspect: What keyword for the user to input to get show timetable feature.
- Alternative 1 (Current choice): Using
showkeyword and a validDAY(optional)input.- Pros: Able to use
showkeyword for the show module and slot details feature too. - Cons: Unable to show error message for an invalid
DAY(optional)input as the program reads the input as aMODULEinput instead. Users have to usehelpcommand or to refer to the User Guide to receive help.
- Pros: Able to use
- Alternative 2: Using
listkeyword and a validDAY(optional)input.- Pros: Easier to create code. No need to have an algorithm figure out if user wants to access show timetable feature or show module and slot details feature.
- Cons: Less user-friendly. Users have to remember another keyword for showing data from Zoomaster.
- Alternative 3: Using
show timetablekeyword and a validDAY(optional)input.- Pros: Less complex code. An additional keyword allows program to easily recognise show timetable feature.
- Cons: Less user-friendly. Users have to type an additional phrase to show their timetable. Experienced users who can memorise the command would not encounter the error message of Alternative 1, thus would find typing the additional keyword troublesome.
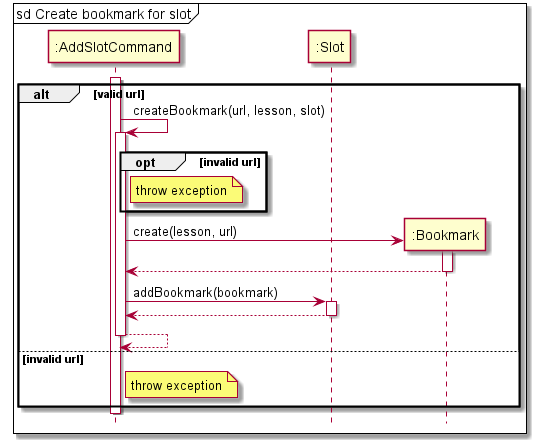
Add Module and Slot feature (Xing Rong)
This feature allows the user to add modules and lesson slots into the timetable. Users can also add bookmarks to specific modules and slots. Users can enter one-shot-commands, adding multiple slots and bookmarks to a module.
The class diagram below mainly shows the associations between the objects contained in the Timetable class. In the
following sequence diagrams, the BookmarkList class is omitted for simplicity.

Given below is a sequence diagram of how the feature works.

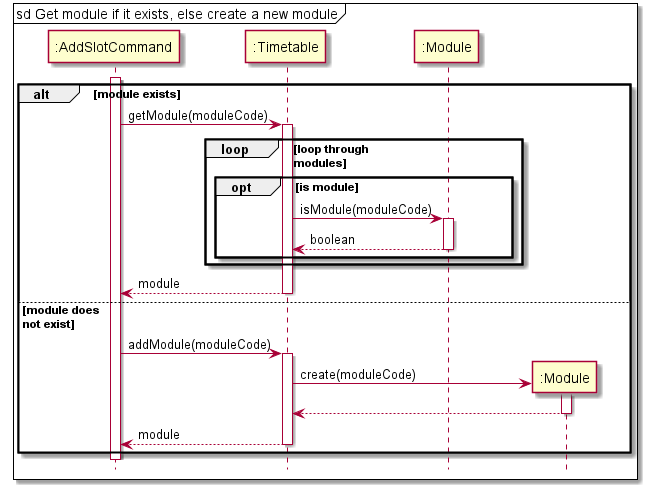
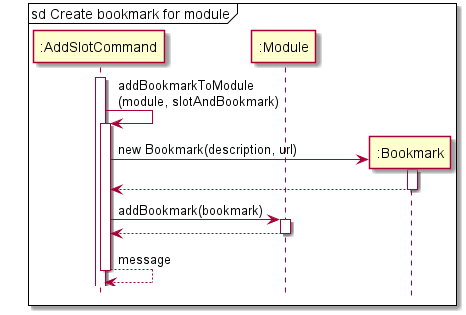


-
After calling execute() method of the AddSlotCommand object, there will be a check on whether the module code entered by the user already exists in the timetable. If it does not exist, then the module will be created.
-
There will then be a check for additional commands pertaining to the module entered by the user.
-
The code will then check if the command is to add a module bookmark or a lesson slot, and do so accordingly.
-
If the command is to add a lesson slot, then there will be a check for a bookmark entry in the command. If there is one, then the bookmark will be added to the lesson slot.
-
Loop to step 3 if there are additional commands which have not been executed.
-
Print the message of all commands executed and error messages.
Design consideration:
Aspect: How to enable fast typing users to add modules, slots and related bookmarks faster
- Alternative 1 (Current choice): allow one-shot command to add slots and bookmarks to a module
- Pros: Fast typers can input faster
- Cons: Difficult to implement
- Alternative 2: separate adding of modules, lesson slots and related bookmarks into different commands
- Pros: Easy to implement
- Pros: Lower chance of error
- Cons: User has to enter multiple commands each at a time to perform the functions, which takes up more time.
Delete Module and Slot feature (Xing Rong)
This feature allows the user to delete the modules, slots and their bookmarks from the timetable.
Given below is a sequence diagram of how the feature works.


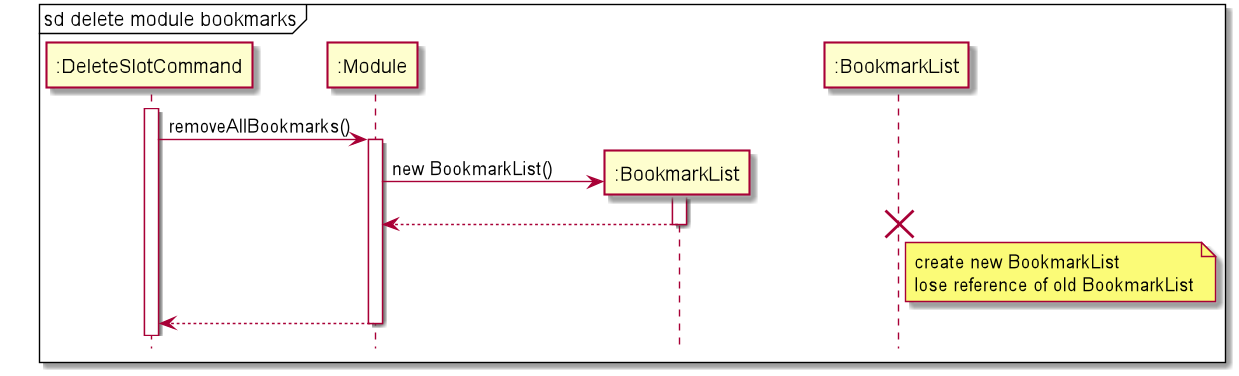

-
There will be a check if the module associated with the deleted object exists. If it does not exist, an exception will be thrown.
-
If the module exists, it will then check what kind of object the user wants to delete. There are four options:
- Delete the module (including everything contained in the module).
- Delete a slot contained in the module.
- Delete all bookmarks associated with the module.
- Delete all bookmarks contained in a slot from the module.
The whole-relationship between the objects, which can be seen from the class diagram Figure 2.07, would mean that
deleting an object would also delete all objects contained in it.
Validate Modules feature (Zhan Hao)
This feature allows the application to validate if the modules entered by the user are existing NUS modules. This helps the user avoid erroneously adding modules from typos, as the application might otherwise consider the input to be a new module (eg. When adding slots to existing module CS2113T, a typo such as CS2113R would cause the application to add a new module instead).
This is done by retrieving a JSON file of existing NUS modules from NUSMods API. The application will then convert the JSON file to an ArrayList of modules, which will be used to validate modules entered by the user. The ArrayList is then stored locally so that subsequent runs of the application will be able to read from the local file instead, which allows the application to be loaded faster. Below is a sequence diagram of the process of retrieving the module list. Note that the alt block is informally used to illustrate the try-catch block.
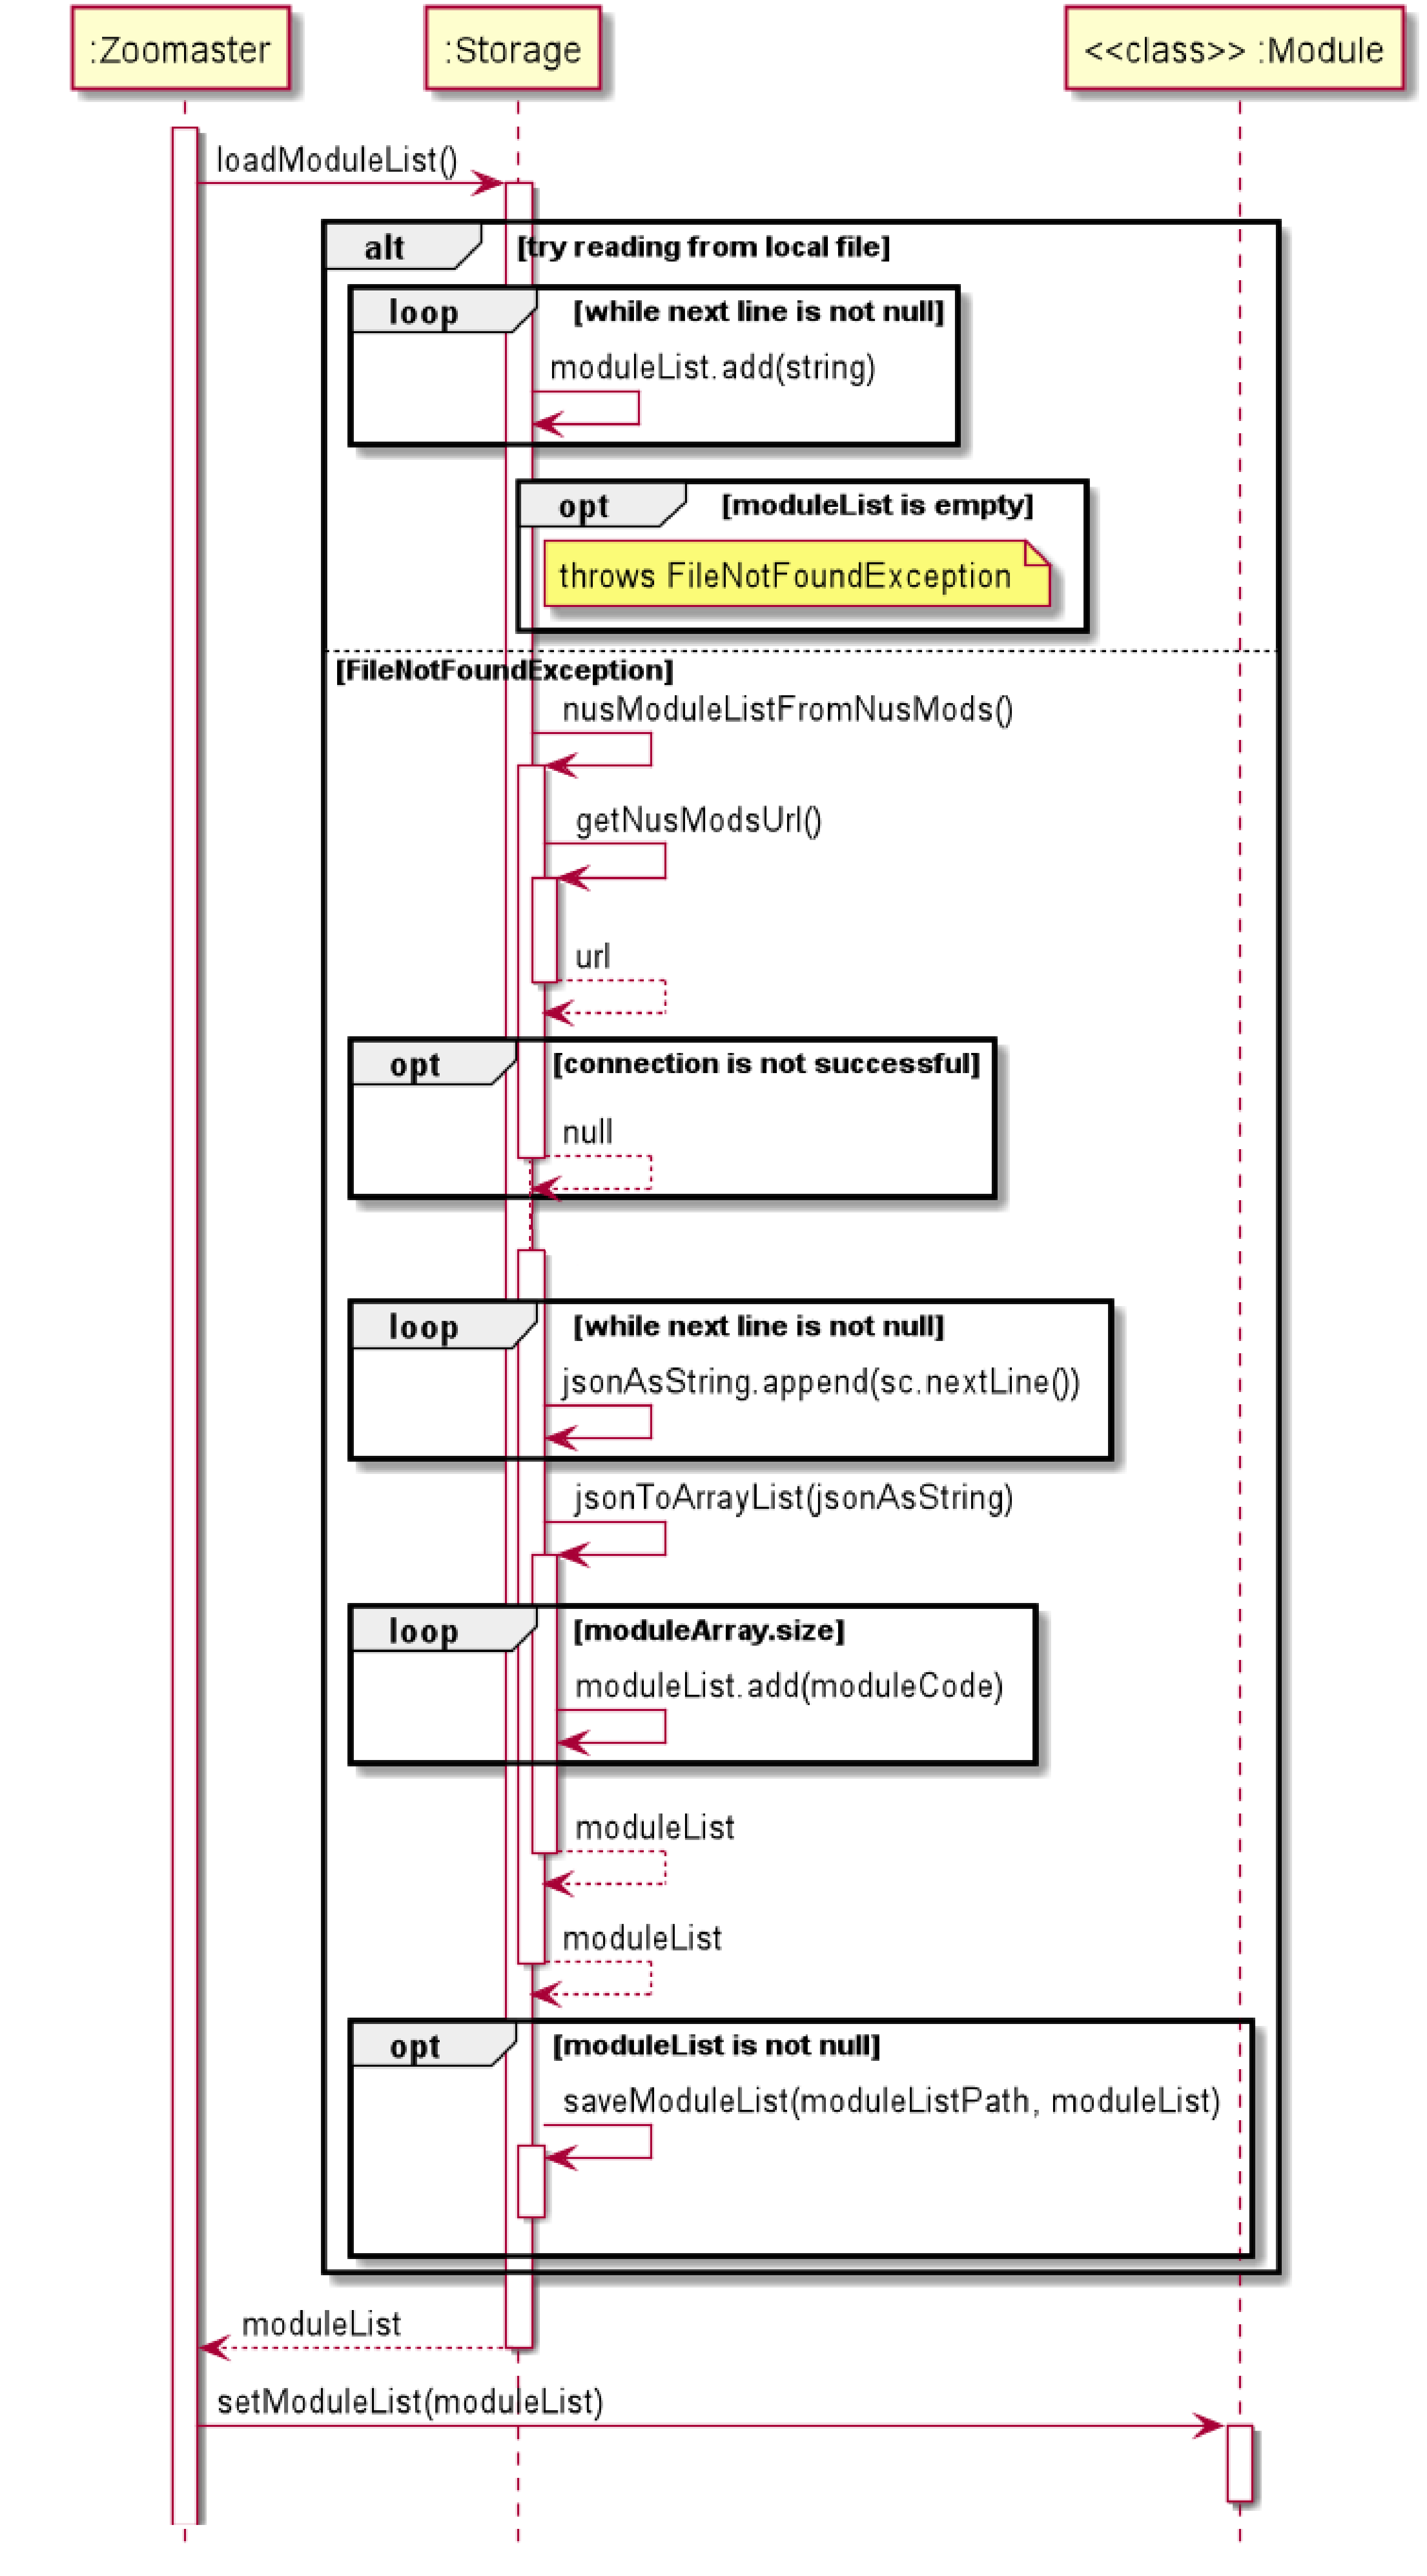
-
When the application is launched, the application will try to read the module list from a modulelist.txt file in the same directory. It will read each line as a separate module and add them to an ArrayList.
-
If it cannot find the local file, or the file is empty, FileNotFoundException will be thrown.
-
When the FileNotFoundException is thrown, the nusModuleListFromNusMods() method will be called. It will first obtain the URL to be accessed using getNusModsUrl(), which creates the URL based on the current year. It will then attempt to connect to the URL.
-
If unable to connect, the method will return null. The importance of this null value will be explained further down.
-
Else if it is able to connect, the application retrieves the JSON file as a string. The jsonToArrayList method is then called to parse the string to a JSONArray, then store the "modulecode" attribute of each JSONArray entry into an ArrayList. This ArrayList is returned to the loadModuleList() method.
-
If the ArrayList value is not null (Connection was successful), it is saved locally using the saveModuleList() method.
-
The ArrayList value is then returned to
Zoomaster, which stores it as a static ArrayList inModule. This ArrayList is then used to validate modules. -
To be validated, the module to be added must exist in the ArrayList. However, if the ArrayList is null (Failed to Connect), the validation will always return true. This is to allow the application to still be usable, although without the module validation feature.
Design consideration:
Aspect: How to allow the validation to be useful in most scenarios
- Alternative 1 (Current choice): Connection is needed once, to retrieve module list for the current year.
- Pros: Allows for updated list of modules based on current year
- Cons: Module validation will not work without initial internet connection
- Alternative 2: Save the module list along with the jar file.
- Pros: Does not require internet connection
- Cons: Module list might not be updated as per the year which the application is being run, prevent newer modules from being added
Since the application is primarily based on launching URLs, having an internet connection is a general requirement for the rest of the application to function. Hence, the cons of the first alternative is not significant.
Aspect: How to increase usability among different users
- Alternative 1 (Current choice): Module list is saved as a editable txt file
- Pros: Allows for editing of module list to include non-NUS modules
- Cons: App start up takes a longer time as module list has to be loaded .
- Alternative 2: Store the module list within the jar file file itself.
- Pros: Faster start up of app
- Cons: Module list cannot be edited, preventing users from other universities taking other modules from adding their modules.
Since the start up time for the app after loading the module list from online is still very fast, it should not affect most users.
Extended HelpCommand feature (Zhan Hao)
This feature allows the user to query more about the different commands available in the different modes. This is to allow quick typist to have a fast way to reference the purpose and format of the commands without having to consult the User Guide.
This command will be sensitive to the current mode of the application. For example, the command help add would print different text in
Bookmark, Timetable, or Planner Mode. The command help edit would be valid in Timetable mode, but not valid in Bookmark mode as such a
command does not exist in that mode.
Below is a sequence diagram of the extended HelpCommand.

![]()
![]()
-
From Figure 2.20, when Zoomaster calls parse() on user input and Parser parses it as a HelpCommand, HelpCommand will check if the details are not empty, then validate if the details match a valid command based on the current mode (not shown in the diagram). If the details are not valid, an exception is thrown. Zoomaster will then call the execute() method on HelpCommand.
-
From Figure 2.21, if the details are empty, the HelpCommand will call the printHelpMessage() in Ui command without the details. Ui will retrieve the current mode through a call to static variable programMode in Parser. The mode is then used to determine which list of available command is to be printed.
-
Else from Figure 2.22, if the details are not empty, the command HelpCommand will call the printHelpMessage(details) in Ui. Similarly, Ui will retrieve the current mode through a call to static variable programMode in Parser. Ui will check if the details correspond to any of the global command keywords, such as CLEAR_KW or EXIT_KW and print accordingly. If the details do not match any, the mode will be used to determine which print extended help method is to be called.
-
The HelpCommand then becomes an unused object to be deleted to free up memory.
-
The different print with colour methods utilise the JAnsi library to print to the Command Prompt in colour.
Edit Slot feature (Francisco)
This feature allows users to edit a slot's title or time. Users can also move slots over to another module.
Given below is an example usage scenario and how the edit mechanism works.
- The user enters
edit title mon 2 new_title. - A new EditSlotCommand instance is created and its
executemethod is called. - Based on the chosen field in the user input, different methods are called:
a. If the command is
edit module, the moveSlotToAnotherModule method in timetable is called to move the slot to a given module. b. If the command isedit title, like in the current example, the slot corresponding to the day and index given in the user input is retrieved by calling the getSlotByIndexInDay method of the timetable. In this case, the 2nd slot on Monday will be returned. The setTitle method of the retrieved slot is then called. c. If the command isedit time, it works similar toedit title, but with changeSlotTime called instead. This method will call setDay(), setStartTime(), and setEndTime() of the retrieved slot.
The sequence diagram below explains how this feature is executed:

Design consideration:
Aspect: What part of a slot should the user be able to edit
- Alternative 1 (Current choice): The user can choose to edit the slot's module, title, or time.
- Pros: Allows for quicker edits.
- Cons: Harder to implement.
- Alternative 2: The user needs to type in the entire slot details (including module, title, and time).
- Pros: Easier to implement.
- Cons: The user needs to type the module, title, and time even when the user only wants to edit one of them.
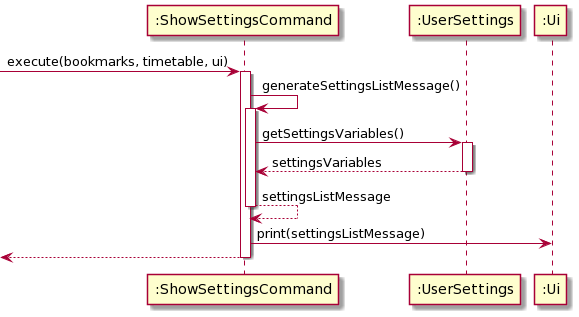
Show settings feature (Francisco)
This feature allows more experienced users to view Zoomaster's settings.
Given below is an example usage scenario and how the showsettings command works.
- The user enters
showsettings - A new ShowSettingsCommand instance is created and its
executemethod is called. - Inside the
executemethod, a private methodgenerateSettingsListMessageis called to generate the string of settings to be printed. generateSettingsListMessageretrieves a list of the user's settings by calling the getSettingsVariables method of the UserSettings object in the main Zoomaster class. It will then convert them into a string and return it.- In
execute, the generated text will be printed by calling theui'sprintmethod.
The sequence diagram below explains how this feature is executed:
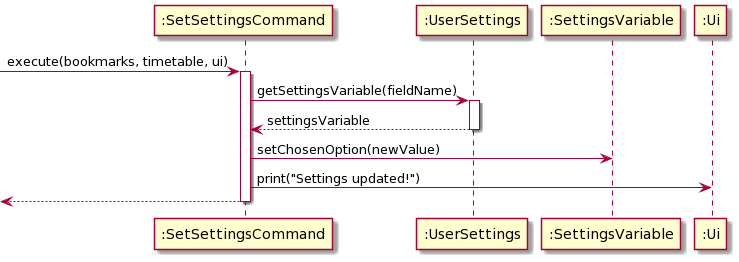
Set settings feature (Francisco)
This feature allows users to change settings as shown from the showsettings command.
Given below is an example usage scenario and how the set command works.
- The user enters
set def_mode timetable, which means set the default mode to timetable mode. - A new SetSettingsCommand instance is created and its
executemethod is called. - Inside the
executemethod, the list of all settings variables is retrieved from theUserSettingsobject inZoomaster. - The corresponding variable is extracted out (in this case,
def_mode), and the value is set totimetable.
The sequence diagram below explains how this feature is executed:
Design consideration:
Aspect: How should the user specify which setting to change
- Alternative 1 (Current choice): The settings all have a name associated with each of them.
- Pros: Allows for more expressive commands (e.g.
set autosave onvs.set 2 on). - Cons: Harder to implement.
- Pros: Allows for more expressive commands (e.g.
- Alternative 2: The user selects a setting to change by its index number.
- Pros: Easier to implement.
- Cons: The user needs to type in
showto know the index number.
Planner feature (Jusuf)
This feature is an extension of the timetable feature that allows users to find common empty slots from each individual timetable. The users can then add a new meeting, and the app will automatically write the meeting to each timetable.
Below is the general flow on how the mechanism works:
- The different timetables must first be loaded into the
plannerfolder manually. - In the app, the user can enter the
loadcommand to load all the timetables and initialise the common empty slots. - To view the slots, the user can enter the
showcommand with or without the day (optional). - The user can also call the
addcommand to add a new meeting, similar to the timetable feature. - Finally, the user can call the
savecommand to store the newly added meeting(s) to each individual timetable.
Some of the key features of the planner mode are the load and save commands.
The general flow of the loading process is as below:
- First, the command clear all the modules in the planner timetable.
- Next, the files inside the
plannerfolder will be loaded and converted to a single timetable. - The empty slots will be initialised based on the previous timetable and it will return an
EMPTYmodule along with all the empty slots. - Finally, a confirmation message will be printed if the loading process is successful.
The sequence diagram below explains how the load planner command is executed:

The general flow of the saving process is as below:
- First, we store the file paths of the individual timetables to an array of files.
- For each file, the command will load the timetable and add the newly added meeting to the timetable.
- Finally, a confirmation message will be printed if the saving process is successful.
The sequence diagram below explains how the load planner command is executed:

Design consideration:
Aspect: How to load and save the group meeting to the timetables.
- Alternative 1 (Current choice): Manually load the individual timetables and save the new meetings (slots and bookmarks) to the timetables.
- Pros: User can decide when to save the newly added meetings (still allow some changes).
- Cons: In case the program crashes, the meeting will not be saved.
- Alternative 2: Automatically load and save the individual timetables per every command.
- Pros: Any changes will be automatically saved, in case that the program crashes
- Cons: Hard to implement
- Cons: Do not allow any further modifications in case the user wants to change the meeting details.
Appendix A: Product scope
Target user profile
- NUS students
- Students with fast typing skills
- Students comfortable with using the command line interface
Value proposition
Zoomaster was developed during the coronavirus pandemic whereby many NUS classes have been transitioned towards online lessons. NUS lessons are mainly conducted on Zoom video conferencing software. However, as Zoom does not store recurring nor past meetings, it is hard for students to easily access their online lessons. Hence, Zoomaster helps to organise students’ Zoom links for easy access to their lessons.
Appendix B: User Stories
| Version | As a ... | I want to ... | So that I can ... |
|---|---|---|---|
| v1.0 | studious NUS student | bookmark important websites from different modules | launch them easily when needed |
| v1.0 | NUS student | label my bookmarks | know quickly the topics of each link |
| v1.0 | busy NUS student | create a timetable within the app which syncs up with the system time | avoid missing my lessons |
| v1.0 | NUS student | take a look at my modules for the day, or the entire week | plan out my day/week |
| v1.0 | new user | see usage instructions | refer to them when I forget how to use the application |
| v2.0 | user | find a to-do item by name | locate a to-do without having to go through the entire list |
| v2.0 | first time user of Zoomaster | be able to see the list commands available | easily navigate through the Zoomaster |
| v2.0 | advanced user | be able to launch multiple links at the same time if the links are grouped together | save time by not doing multiple launching commands |
| v2.0 | advanced user | edit my bookmarks and timetable lists according to changes in my module and timetable | quickly make changes to my lessons |
| v2.0 | busy user | have an indicator telling me the current time | easily check on the time in a hurry |
| v2.0 | fast typer | be able to type a one-shot-command when entering the details of the lessons in my timetable | add the lesson details faster |
| v2.0 | busy NUS student | be able quickly launch my next Zoom lesson | avoid being late for my lessons |
| v2.0 | NUS student | find common empty slots between my teammates | plan my group meetings accordingly and efficiently |
| v2.0 | NUS student | save my group meetings to my timetable | avoid missing my group meetings |
Appendix C: Non-Functional Requirements
- The App should work on any mainstream OS as long as it has Java
11installed. - A user with above-average typing speed should be able to accomplish most of the tasks faster using commands than using the mouse.
Appendix D Glossary
Zoom
A popular video communication program by a company of the same name
UML
Unified Modeling Language, a standard to visualize the design of a system
UI
User Interface
ANSI
American National Standards Institute, ANSI characters is a popular character set used by programmers
NUS
National University of Singapore
Mainstream OS
Windows, Linux, Unix, OS-X
Appendix E: Instructions for manual testing
- Initial launch
- Download the jar file and copy it into an empty folder.
- Open the command prompt and change directory to the location of the jar file.
- Enter
java -jar zoomaster.jarin the command line. You should expect to see the welcome screen of the application.
- Testing
- Download the test cases text file from github here. Its name is input.txt.
- These are some the sample test cases used to test if the program is working as intended. You should get the same results
as shown in EXPECTED.txt file. - You can refer to the User Guide for the full list of features and available commands for Zoomaster.
- Now you can manually input test cases into Zoomaster and see the results.
- Note that the output of the application is dependent on the system time of your machine.
- Saving and Loading
- Saving and loading of data is done automatically in Zoomaster.
- The application uses the Gson library to convert the java objects in Zoomaster into JSON constructs, then writing them into the text files stored locally in the machine.
- Data is stored in 3 separate text files;
bookmarks.txt,modulelist.txtandtimetable.txtwhich are located in thedatafolder. Thedatafolder is created in the directory wherezoomaster.jaris placed. - To test the saving feature, you can enter input some data into the Zoomaster through the command line interface
such as using the commands
mode timetablethenadd CS2113T. - Exit the application by using the command
exitand look in thetimetable.txtfile. The module "CS2113T" should be recorded. - You can test the loading feature by launching Zoomaster and entering the commands
mode timetableandadd CS2113T. There should be a message that the module "CS2113T" already exists. - You can also edit the data in the text files in JSON format and test the loading of data into the Zoomaster by launching the application. You can refer to the class diagrams above for the associations between the classes.
-
Testing global commands (
mode,help,clear,showsettings,set,exit)- Test
modecommand. Entermode bookmarkto enter bookmark mode, you should see the message "Changing to bookmark mode".
Entermode timetableto enter bookmark mode, you should see the message "Changing to timetable mode".
Entermode plannerto enter bookmark mode, you should see the message "Changing to planner mode". - Test
helpcommand. In bookmark mode, enterhelp, you should see message "Available inputs in Bookmark mode are" and the list available commands. Then, enterhelp add, you should see message "Adds a bookmark to the bookmark list URL must start with www or https:// or http:// Format: add {description} {URL}". - Test
clear. Enterclear, you should see your screen is cleared. - Test
showsetings. Entershowsettings, you should see two settings in a list. - Test
set. Enterset def_mode timetable, you should see that the default mode is nowtimetable. - Test
exit. EnterExit, you should see message "Bye. Hope to see you again soon!" and the program is terminated. - Run the jar file again, the program should be in
timetable.
- Test
-
Testing bookmark commands (
add,show,delete,find,edit,launch)- Test
add. Enteradd google www.google.com, you should see message "Added bookmark: [google] www.google.com". - Test
show. Entershow, if you did not add any other bookmark except that of step 1, you should see message "Here are the bookmarks in your list: 1.[google] www.google.com". - Test
find. Enterfind google, you should see message "Here are your matching bookmarks 1.[google] www.google.com". - Test
edit. Enteredit desc 1 search, and then typeshowand you should see that the description is now[search]. Enteredit url 1 www.bing.com, and then typeshowand you should see that the URL is nowwww.bing.com. - Test
delete. Enterdelete 1, you should see message "I've deleted this bookmark!: [google] www.google.com". - Test
launch. Re-add bookmark from step 1 and enterlaunch 1, you should see www.google.com launched in your browser.
- Test
-
Testing timetable commands (
add,show,edit,delete,launch)- Test
add. Enteradd cs2113t lecture fri 16:00 18:00 www.github.com, you should see message "CS2113T added lecture slot added bookmark added to CS2113T lecture". - Test
show. Entershow, if you did not add any other slot except that of step 1, you should see a lesson slot from 16:00 to 18:00 on fridays with description "lecture CS2113T". Entershow fri, and you should see the same lesson slot. Entershow today, if your system date is friday, you should.see the lesson slot. Else you should see message "No lesson" and the current time indicator. - Test
edit. Enteredit module fri 2 cs2113, you should see message "Slot moved to CS2113". Enteredit title fri 2 tutorial, you should see message "Slot title changed to tutorial". Enteredit time fri 2 thu 17:00 18:00, you should see message "Slot time changed to thu 17:00 18:00". - Test
delete. Enterdelete cs2113 1, you should see message "deleted 17:00-18:00 tutorial from cs2113". - Test
launch. Re-add slot from step 1 and enterlaunch cs2113t 1, you should see www.github.com launched in your browser.
- Test
-
Testing planner commands (
load,add,show,save)- Test
load. First, manually copy your teammates' timetable to the/data/planner/folder. Enterloadand you should see aplanner loadedmessage if successful. - Test
show. Entershowand you should see the list of empty time slots. Entershow fri, and you should see the list of empty slots on Friday. - Test
add. Enteradd cs2113t lecture fri 16:00 18:00 www.github.com, you should see message "CS2113T added lecture slot added bookmark added to CS2113T lecture". - Test
save. Entersaveand you should see aplanner savedmessage.
- Test
-
Testing
launch now- First, get your current system time. You can view this via your clock app on your device.
- Secondly, in timetable mode, use the
addcommand to create a new slot with period overlapping with your current system time. - Thirdly, use
addcommand to add a bookmark (e.g. www.google.com) to the slot you created in step 2. - Lastly, enter
launch now, you should see the bookmark you entered launched in your browser.